The Panasonic Lumix GF-1, and pondering the photography needs of a food blogger: "
(Hi everyone. As Guruman posted, I was hospitalized for emergency surgery 2 weeks ago, and I’m still in hospital unfortunately. So there won’t be any new recipes from me for the time being. However, I still have lots of topics from my Japan trip to talk about. Here’s an article I was working on before I had to go to the doctor, and I was able to finish it up today finally. I’ll try to be back to full throttle real soon!)
Back in March, I got a new camera in Tokyo; the Panasonic Lumix DMC-GF1Back in the olden days - say, prior to 2005 - photography was not necessarily a high priority for food blogs. These days of course that has changed drastically. So many food blogs feature gorgeous, mouthwatering photography these days that if yours doesn’t, you may feel a bit left behind.
Since starting Just Hungry back in 2003, I’ve gone through a number of digital cameras. Last year, as the photographic needs of Just Hungry and Just Bento got to a critical point, I splurged on a serious DSLR - a Nikon D700, together with two Nikkor lenses (a 50mm and a macro lens). The purchase of this kit burned a serious hole in our household budget, but we justified it between us since The Guy (aka Guruman) could also use it for his photography (he is into train and architectural photography, and still has a Hasselblad that he hauls out on occasion for serious film shooting). I also carried around a compact point and shoot in my handbag - a Sony DSC-W300. For a while, I was pretty happy with this combination. But still, there were disadvantages to both. Before I get to those though, let’s take a look at…
For what situations does a food blogger need a camera for?
Every food blog is different of course, but they do share some common needs when it comes to cameras. We need them for one or more of these situations:
- “Studio” shots at home, of food we make, more often than not to accompany a recipe. The studio may just be your kitchen counter or dining table or a window sill with bright light, but you have a fair amount of control over lighting conditions and such, and some time to set up a shot.
- Shots of food in restaurants, especially if you’re a food blogger who posts a lot of restaurant reviews, or just like to post shots of memorable meals eaten out. You rarely if ever have control over the lighting and such in these situations. Many times a restaurant is very dark.
- Shots of food and more in other situations, at markets, stores, at the farm, or what have you. Again, you don’t have control over lighting and such, and you need to shoot quite quickly in most cases.
- General photography of landscapes, people and so on, which may or may not be related to food or your blog.
A full size DSLR is great for the first situation. For the best shots, I use my DSLR with a tripod, available diffused light or studio lighting - a subject about which I still have a lot to learn. It takes time to set these shots up, so it’s good when I have the time to spare, and ideal if I’m shooting more than one subject at a time.
But for the other situations it’s not really ideal. First of all, it’s really heavy; carrying it around for hours gets quite old, especially if you are a weakling with poor upper body strength like me. It’s also rather obstrusive, especially in a restaurant setting, with its bulk, big lenses, and loud shutter noise. You may not mind when other diners glare in your direction as you shoot away at your food, but - well, it does bother me rather.
A good point-and-shoot compact camera, or a cellphone with a good built in camera, is great for on-the-road shooting, in terms of its size (fits into a pocket) weight (almost nothing) and general unobtrusiveness (the shutter noise is digital, not mechanical, so you can turn usually it off for totally silent shooting). But there are disadvantages, such as the inevitable shutter delay and the general lack of control over your shooting settings.
Enter the micro four thirds format
Micro four thirds format cameras are basically miniaturized DSLRs - small cameras with big sensors. The size of the sensor is the biggest difference between a DSLR and a point and shoot, and what makes DSLR photos just that much richer and deeper. Micro four thirds cameras have smaller sensors than DSLRs but much bigger sensors than compact cameras. They also have interchangeable lenses. They lack the full features of a big DSLR, but for me, these are more than compensated for by their small size and light weight. (See the Wikipedia entry for more about the micro four thirds format.)
Micro four thirds cameras available at the moment from Olympus (the EP or PEN series) and Panasonic (the Lumix G-series). I wanted to get one in Japan, where camera equipment is bit cheaper than in the U.S. and considerably cheaper than in Europe. After reading pages and pages of reviews in both Japanese and English, I went with the GF-1 over the Olympus PEN. I got it shortly before I went to Kyoto back in mid-March, and I’m so glad I did. I’m in love with this little camera. Mine is in “Urban Red”: colored bodies are only available in Japan I believe; other available colors include white, silver and pearly pink. Elsewhere (or at least in North America and Europe) you can just get the basic black model.
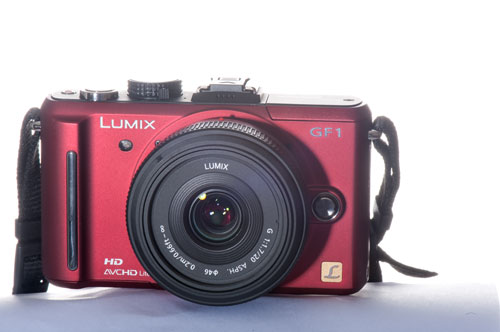
The camera body of the GF-1 measures 5 x 10 x 7 inches (36mm x 119mm x 71mm) 4.68 x 2.79 x 1.43 inches (119 x 71 x 36.3mm) (dimensions corrected - don’t rely on what Amazon says!). It comes with a choice of one of two kit lenses, a 14 - 45 mm f/3.5 - f/5.6 zoom lens, and a 20mm f/1.7 aspherical “pancake” lens. I wasn’t sure which one was better to have, so I got the camera with the “pancake” lens, and purchased the zoom lens separately. However, in the 4 months or so that I’ve had the camera, I’ve only used the zoom lens a few times. The pancake lens is just terrific for my needs - it’s superfast, letting me take great pictures in low light conditions. It’s also very compact and lightweight, and just feels like an integral part of the camera. The zoom lens makes the little camera body feel unbalanced. The “pancake” lens is a fixed focus lens, which may take a little getting used to if you’re used to zooming in and out all the time, but it wasn’t a bit deal for me since I don’t zoom that much anyway. It just means you have to physically move to get the right shot.
Most of the photos taken for the recent Postcards from Kyoto series of posts were taken with the GF-1, using the pancake lens. When I’m out and about and walking around, I almost exclusively use the “intelligent auto (iA)” setting. When I have a bit more time to shoot I do try the other settings.
One other advantage of the GF-1 is that it can save photos on RAW format, which is ideal for editing later on in Photoshop, Lightroom and so on.
The GF-1 + aspherical lens for shooting food
When you use the GF-1 with the 20mm “pancake” lens, it’s easy to take the shallow depth of field type of food shot that is popular these days, where the area in focus is limited and the background is blurred. In addition, the lens is so fast that you can shoot photos of food under all but the lowest light conditions, and it comes out looking great. The shallow depth of field can be a drawback for some shots, so I needed to work around it a bit, but for more food closeup shots it works quite well.
Some un-post-processed food photos taken with the GF-1
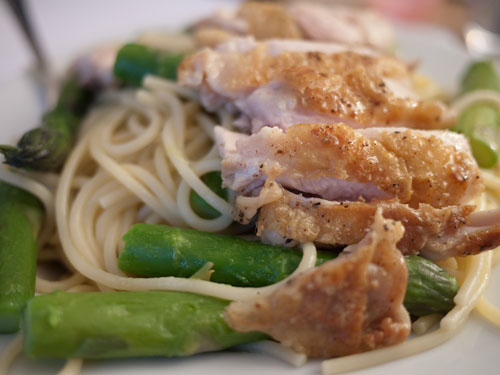
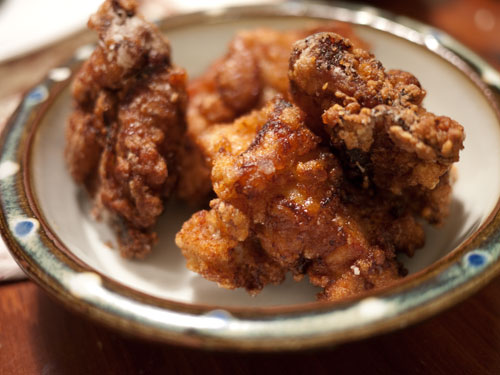
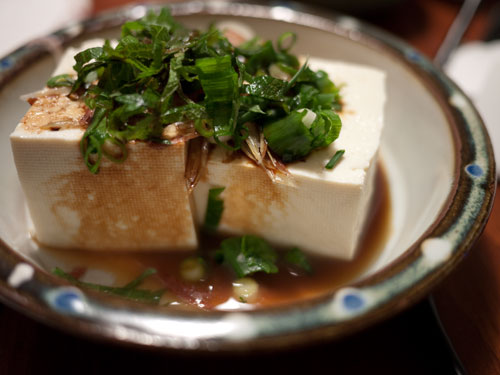
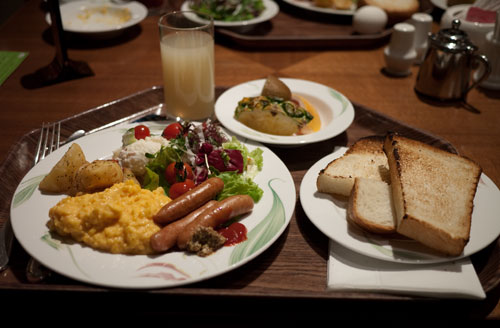
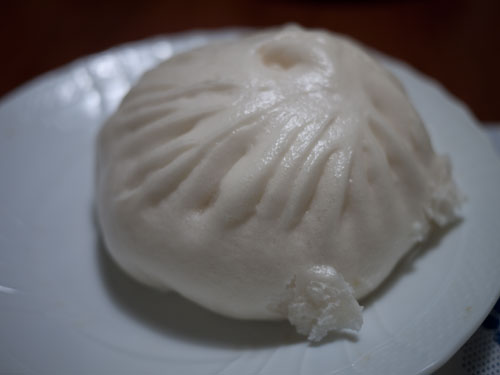
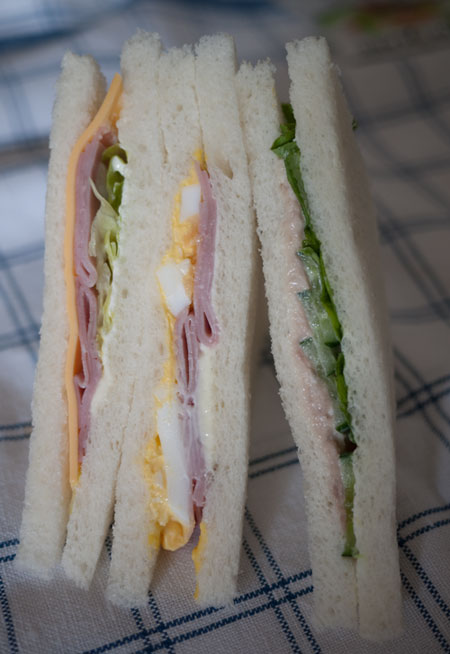
All of the example photos below were taken with available light, and have not been post-processed in Photoshop and so on in any way, except to crop and resize them down for web publishing. Note that I didn’t exactly try to style the food beforehand either, and for a regular blog post I might post-process some of the photos a wee bit. But here I just wanted to show what the camera can do in various light conditions. You can look through my recent flickr uploads for more examples.
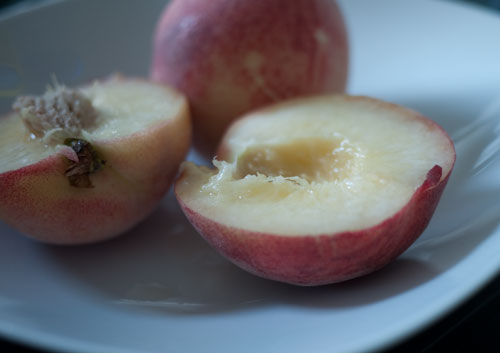
This was a simple dish of panfried chicken and boiled asparagus with pasta that we had for dinner one night. The photo was shot just with the light from two halogen floor lamps.
The following photos also taken at night, under a plain pendant lamp with a 100W incandescent bulb.
Chicken karaage (fried chicken):
Hiyayakko (cold tofu), a staple of summer:
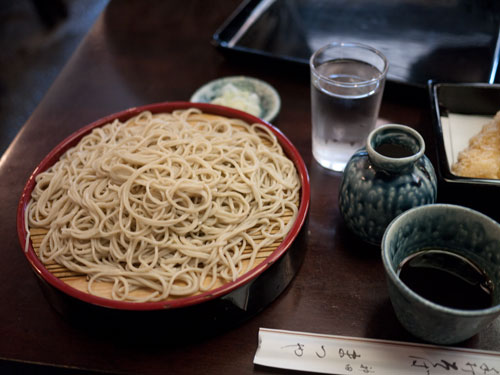
This photo was taken in a windowless hotel dining room, under some rather dim, shaded flourescent lights:
This photo of a steamed bun (from my favorite steamed bun place in Yokohama…or the world…oh I want one NOW…uh, where was I) was shot under a fairly bright flourescent light:
These 7-11 konbini sandwiches were shot during the day, on a table that’s about 15 feet away (5m) from a large south-facing window:
Pros and cons of the micro four thirds format
Micro four third format cameras may not be for everyone. For one thing they are quite expensive - you can pick up an older DSLR model for cheaper, not including the lenses. If you don’t mind lugging around a heavy DSLR body and big lenses, then a full size DSLR is what you want.
The GF-1 is quite compact, but it’s not small enought to carry in your pocket. (If you want a compact point and shoot that can save photos in the RAW format, you should look into the Canon PowerShot S90, which I almost went for myself.) The GF-1 does not have a viewfinder, so you have to rely on the monitor. And the viewfinder attachment, a separate purchase, is not really worth getting in my opinion, since it adds bulk to the camera and is low resolution. Finally, the GF-1 does shoot video, but is rather limited in that respect. It’s not the camera for you if you are looking for a all-in-one solution for video and still photography.
Still, for me the weight, compactness, and versatility of this camera is well worth it. I usually have the GF-1 in my shoulder bag, which I have with me all the time - the camera stuff takes up half of the bag, and I put my wallet and so on in the other half. It is light enough for me to be able to have it with me all the time. And I just love that fast little “pancake” lens. Carrying the D700 around with me like this would just not be possible.
Anyway, if you’re a food blogger considering a camera upgrade, or just in the market for a new camera, I’d heartily recommend giving the Panasonic Lumix DMC-GF1
Incidentally, in Japan micro four thirds format cameras are being marketed quite heavily to women - the female amateur photographer who wants to move up from a point-and-shoot. This accounts for the variety of colored bodies I think. Men love it too though; these are serious cameras after all, but lightweight enough to have with you all the time.
Notes: Buying camera equipment in Japan
I mentioned that Japanese cameras are a bit cheaper in Japan, and you get the option of buying them in those pretty colors that they don’t sell overseas. If you are considering purchasing a camera in Japan though, ask the seller if the language can be switched from Japanese. My GF-1 only has Japanese menus and so on, which is not an issue for me of course, but could be for you. The language thing is not an issue with accessories like lenses though. If you are a girly type, you can also find all sorts of cute accessories for your camera, such as pretty camera bags and straps. Manuals can be downloaded in several langauges from the vendors’ websites.(Standard disclaimer: I bought the camera and all accessories with my own money, and these are my honest opinions, for which I’m not being compensated in any way.)
No comments:
Post a Comment